
As the first step in the checkout process, you review what is in the cart and make any necessary changes.
Important:
● Not all the steps below apply to all products. The selections available to you depend on the products in the cart. In addition, if the cart contains a mix of products, some steps may apply to some products in the cart but not to others.
● Also note that some products must be checked out individually. You will be prevented from checking out if the cart contains such a product (for example, a CMM campaign activity) in addition to other products. You can save the other products for later so you can check out the one that needs to be checked out by itself.
1. If necessary, use the calendar to select the Due Date (and time).
2. Be sure to click Save if you make a change to the date or time.
Note: If you select a date and then add other products to the cart or if you exit the cart and then return to it, you will need to re-select the date you want.
● To see the address of the selected Print Shop (or to change the Print Shop), click its name.
Note: (U.S. only) A direct mail product has the selected Print Shop displayed below the mailing date. To change the Print Shop, click its name. After you change the Print Shop, you will need to process the mailing list again because a change in Print Shop requires a recalculation of the postage price.
Some products (such as campaign activities and direct mail products) have mailing dates instead of due dates.
● To change the mailing date, click the date.
Notes:
● For a campaign activity, you are returned to the Initialize page where you can click Configure and then change the date of the activity.
● For a direct mail product, you are returned to the mailing options step of the order process so you can select a different date.
If rush delivery is available, a message informs you. Click the calendar to select the date/time you want and see what the additional fee will be.
Note: If the site is configured to limit the number of items (jobs) you can have in the cart (including items saved for later), a message informs you when you have reached the maximum number of items. You will not be able to add any more items to the cart unless you remove an item that is currently in the cart or saved for later.

Under Products, review what is in your cart and make any necessary adjustments:
1. To see the job details for a product, click its name. You can then make any necessary changes.
Notes:
● Not all products can be edited when you click the job name. For example, if you want to edit a campaign activity, you must open the Campaign Dashboard and open the campaign.
● If you are re-ordering a product, it is always a good idea to review the job details (if you are allowed to do so) before placing the order. Sometimes a message in the cart informs you that ticketing (print) options or content files changed since you last ordered the product. Depending on the product, you may be able to click a link to review the job, its contents, and its print options.

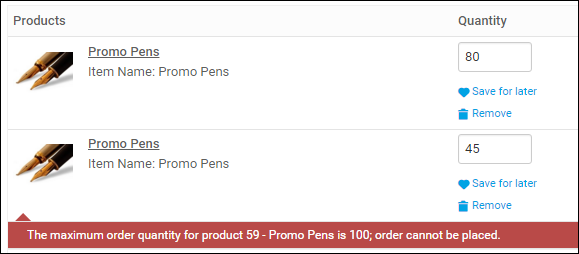
2. If necessary, change the Quantity for an item.
Note: You may get a warning that the maximum order quantity for a product was exceeded. This happens if you added the same product to the cart more than once, and the combined ordered quantity for the product exceeds the maximum. For example, the maximum order quantity is 100, but you ordered 80 in one line item and 45 in another. Reduce the Quantity of the items so the total is less than or equal to the maximum order quantity.
Notes:
● The quantity for a digital download is always 1. If you are both printing and downloading a product, the download quantity is 1 regardless of the print quantity.
● The quantity for a multi-record VDP is also always 1 (the number of records that make up the order is displayed below the quantity).
3. If a product has a choice of deliverables, what you selected during the order process is identified, for example, Print and Download. To change the deliverable, click the link, make your change, and click Update.

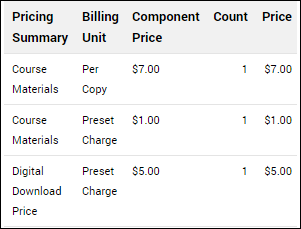
4. To see a pricing summary, move the pointer over the price next to a product. Additional information is then displayed. For example, if you are both printing and downloading a product, you will see a breakdown of prices for the printed version and digital download.
5. If you do not want to check out an item now, click Save for later. (Saved items are listed in the cart under Saved for Later Items. When you are ready to purchase a saved item, click Move to Cart.)
Note: Some products must be checked out individually. In this case a warning is displayed. Save the other items for later so you can check out the product that must be checked out by itself.
6. To remove a product from the cart, click Remove. (To remove all items from the cart, click Clear Cart.)
Notes:
● If the item you are ordering requires a price quote from the Print Shop, you will see Requires Quote as the item total. After you complete the checkout process, the Print Shop will contact you via e-mail with a quote, which you can either accept or decline.
● Depending on the Print Shop, the turnaround time may be displayed under each item in the cart. In addition, a handling charge may be displayed under the subtotal. Note that a handling charge is always per recipient so if the handling charge is $10, and you specify three recipients, the total handling charge is $30.
7. To continue to the next step of checkout, click Proceed to Checkout.