
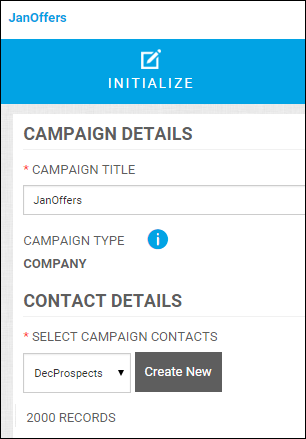
After you name your campaign, you must initialize it by selecting the contacts you want to use for the campaign – the list of the people you are targeting.
When you order a CMM campaign for the first time, you must create a contact list. Typically you import contacts from a CSV file or from a company address book and then use filters so the list meets certain criteria (for example, city or age). The resulting list is also called a filter set.
The contacts you import are always available so you can select all of them or use filters to select a subset of the contacts.
Note: In the U.S. you may also have the option of using EDDM (Every Door Direct Mail) to generate and purchase a list based on postal routes you select on a map.
After you create a filter set, you can select it for the campaign you are ordering, edit an existing filter set, or create a new contact list and filter set.
1. (U.S. only) If given the choice, select Use Filter Set or Use EDDM.
2. If you selected Use Filter Set (or if no choice was available), do one of the following:
● Select an existing filter set (under SELECT CAMPAIGN CONTACTS) and click Next (or click Save if you want to save what you selected so far and continue later).
Tip: After you save the campaign contacts you want to use, your work is automatically saved as you complete subsequent steps. If you need to resume the order process later, you can do so from the Campaign Dashboard. (To open the dashboard, click Campaign Dashboard on the account menu.)
● Click Create New to open the My Contacts window where you can import contacts, edit an existing filter set, or create a new filter set.
Note: After creating or editing a filter set, select it on the Initialize page under SELECT CAMPAIGN CONTACTS.
3. (U.S. only) If you selected Use EDDM:
a. Click Next.
You will be taken directly to the Customize page, after which you complete the Configure and Launch pages. On the Launch page, you will see a Purchase EDDM & Add to Cart button next to any printed materials that need to be mailed.
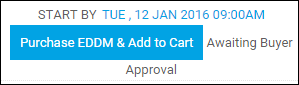
b. Click Purchase EDDM & Add to Cart.
c. Make your selections on the map and generate the list as described here in steps 3 to 6.
4. (U.S. only) If you selected Purchase Data List:
a. Click Next.
You will be taken directly to the Customize page, after which you complete the Configure and Launch pages. On the Launch page, you will see a Purchase List & Add to Cart button next to any printed materials that need to be mailed.
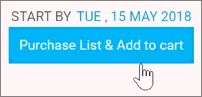
b. Click Purchase List & Add to Cart.
c. Populate your search criteria to generate the list as described here in steps 1 to 5 and then click Add to Cart.