The final step in ordering a CMM campaign is to launch it by starting the first activity. When you start an activity, you add it to the cart and pay for it. As the campaign progresses, you are notified when subsequent activities need your approval (and payment). Not all activities require approval, and some activities are automatically approved if a certain number of responses is received.
(U.S. only) If a campaign was configured to include a direct mail product (for example, a promotional postcard you are mailing), your contact list must be generated and processed before it is added to the cart.
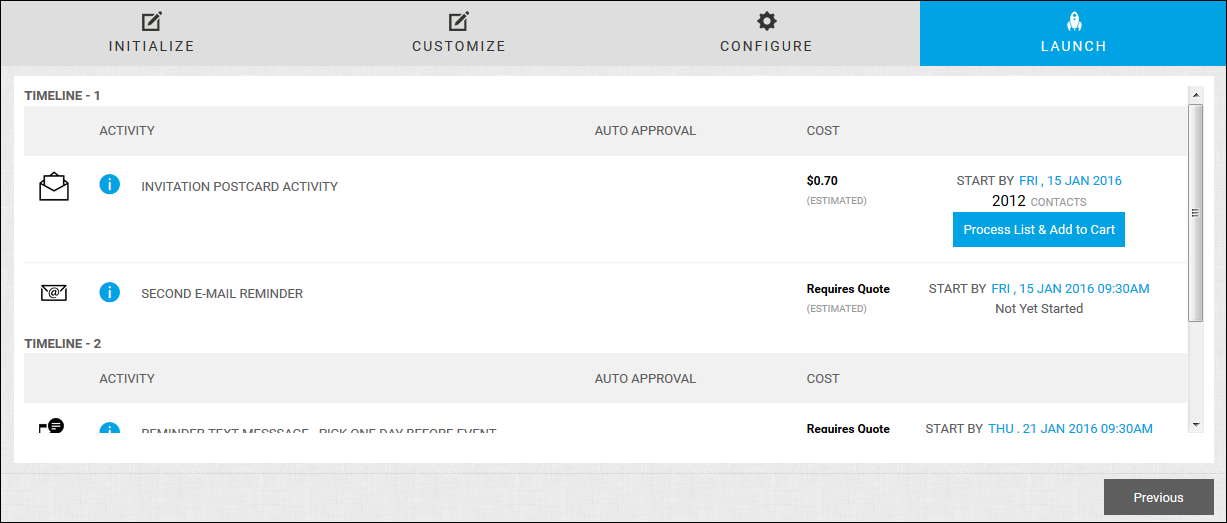
The Launch page lists the CMM campaign activities you scheduled on the Configure page and identifies their start date and status. It also identifies activities that require your approval.
Tip: To return to the Launch page later, open the Campaign Dashboard, open the campaign, and click Launch.
Tip: To review the timeline of any activity listed on the Launch page, click ![]() .
.
1. Before starting the first activity, click Initialize to make sure the correct contact list is selected. After you launch the campaign, you cannot change this. (To return to the Launch page, click Launch.)
2. Start the first activity. (You can do this before the start date.) Depending on button that is displayed, click Add to Cart, Process List & Add to Cart, or Purchase EDDM & Add to Cart. (List processing and EDDM apply only in the U.S. for direct mail products.)
3. Complete one of the following procedures, depending on the activity you are starting:
● If you clicked Add to Cart, check out as usual. Until you check out, the status of the activity on the Launch page is Awaiting Order Placement.
● (U.S. only) If you clicked Process List & Add to Cart, process the list as described here in steps 3 to 5 and then complete the checkout process.
● (U.S. only) If you clicked Purchase EDDM & Add to Cart, make your selections on the map and generate the list as described here in steps 3 to 6. Then complete the checkout process.
Note: A CMM campaign activity must always be checked out individually. You cannot check out a campaign activity with any other products or with another campaign activity.
4. As the campaign progresses, you are notified when it is time to start the next activity. Start the activity on the Launch page by adding the activity to the cart and paying for it. (Auto approved activities start automatically.)
Tip: To return to the Launch page, open the Campaign Dashboard, open the campaign, and click Launch.
5. See the tips below for adjustments you may want to make as the campaign progresses.
After you start the first activity, you can start to track the progress of the CMM campaign in the Campaign Dashboard. Note the following:
● If the start dates of any subsequent activities need adjusting, change the dates on the Configure page. For example, perhaps the printed postcard that launched your campaign was mailed later than originally planned, or you started an activity late. This may affect subsequent dates.
Tip: To return to the Configure page, open the Campaign Dashboard, open the campaign, and click Configure.
● Depending on the response rate, you may want to set up auto approval (if available) for some subsequent activities on the Configure page. For example, you may want the response rate to be higher before the next activity occurs; auto approval takes care of this for you.
Note: When you auto-approve an activity, the payment method you used for the starting activity in the campaign is used for all subsequent activities that you are auto-approving. The payment method can be a purchase order, cost center, or accounting code, but cannot be a credit card or PayPal. If a credit card or PayPal is used for the initial payment, auto approval will not work; you will need to check out and pay for the activity as usual.
● As you place orders for CMM campaign activities, they are listed individually in your order history. You will not see anything in your order history for the overall campaign. The campaign itself is listed on the Campaign Dashboard.