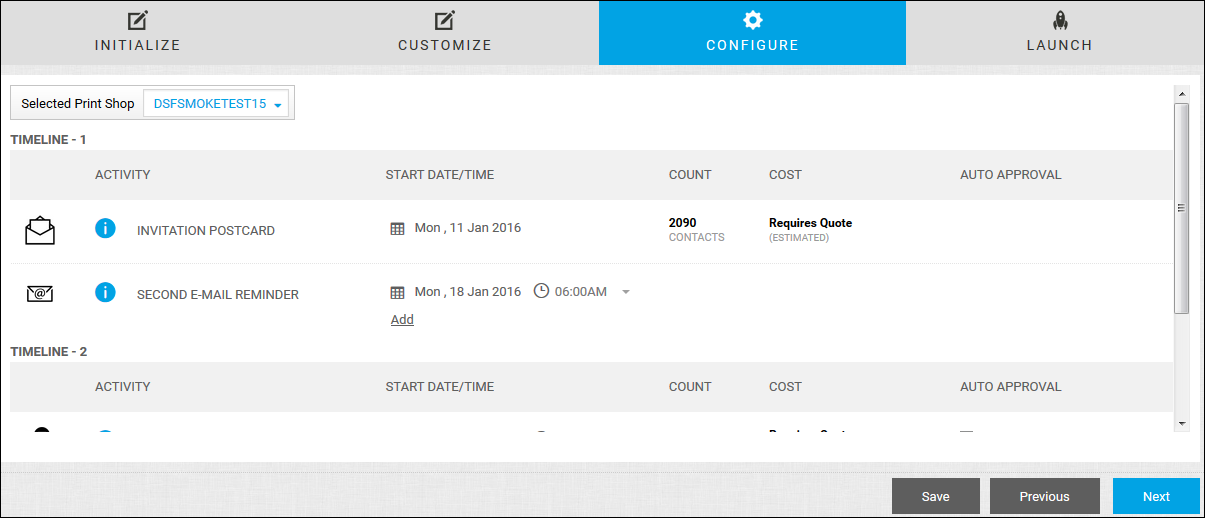
After you customize the media elements that make up the CMM campaign you are ordering, you must schedule the activities that make up the campaign. The Configure page lists all the campaign activities that must be started. One activity is the starting point for the campaign, and the timing of subsequent activities (such as reminder e-mails) should be based on this starting date in a logical sequence.
The timing of activities is not necessarily linear. For example, the campaign begins with an e-mail sent to your contact list encouraging them to register for an event. Depending on the response, one e-mail is sent to those who registered while a different e-mail reminds non-responders of the event again. This type of “branching” is very common in campaigns
Some activities require your approval (by being paid for) as their start dates come up. Other activities may include an auto approval option. If you take this option, an activity begins as soon as a specified number of responses is received. (The availability of auto approval depends on the CMM campaign you are ordering.)
All activities except for the starting activity can be repeated. For example, you may want to send the same reminder e-mail or text message more than once. If you repeat an activity, the same media element is not sent to the same contact more than once. Repeated activities are useful when, for example, you want to send a reminder e-mail to those who register for an event, and the registrants change over a period of time.
Tip: To return to the Configure page later, open the Campaign Dashboard, open the campaign, and click Configure.
● If the CMM campaign begins with printed material, the start date is the date on which the printed material is ready for shipping. When you select this start date, you are prevented from selecting a date that does not account for the Print Shop's minimum turnaround time and days of operation.
● If the CMM campaign begins with digital material, it is sent out on the selected start date.
● For subsequent activities, the date you select is the date you are notified an activity is due to start. Unless the activity is auto-approved, it will not start until you approve it (pay for it).
● When a subsequent activity involves printed material, production begins after you approve the activity, unless the activity is auto-approved, in which case production starts on the selected date. The delivery of the printed material is based on the Print Shop's minimum turnaround time.
● When a subsequent activity involves a digital media element, the activity starts on the selected date (if auto-approved) or after you approve it.
1. Make sure the Selected Print Shop is correct. For direct mail products (U.S. only) this affects postage costs.
2. Begin with the first activity listed and select a date (following the date guidelines above).
Tip: To review the timeline for an activity, click ![]() .
.
3. Continue to the next activity and do one of the following:
● Select a date (and time) that is later than the one for the previous activity. Follow the date guidelines. You are notified when this date comes due and can then start the activity by adding it to the cart and paying for it.
● If an activity can be auto-approved, and you want to use this feature, select the if Response Range check box and enter the range of responses required before the activity takes place. The activity will take place as soon as the number of responses falls into this range.

Note: When auto approval is set up for an activity, the payment method you use for the starting activity in the campaign is used for all subsequent activities that you are auto-approving. The payment method can be a purchase order, cost center, or accounting code, but cannot be a credit card or PayPal. If a credit card or PayPal is used for the initial payment, auto approval will not work; you will need to check out and pay for the activity as usual.
4. To repeat the activity (for example, to send the same e-mail reminder a few days later), click Add and select the date and time. (To remove an added activity, click ![]() .)
.)
Note: The same media element is not sent to the same contact more than once.
5. Repeat steps 3 to 4 for all the activities listed. (All activities must be configured before you can continue.)
6. Click Next to continue to the Launch page.